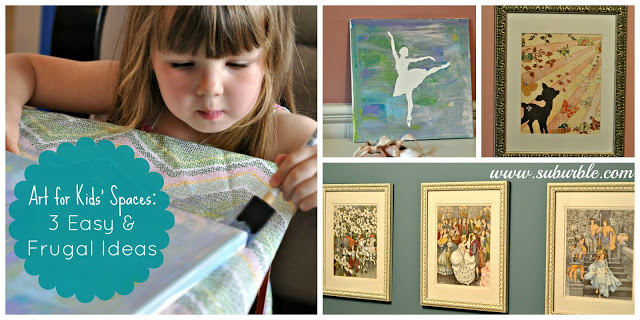
I love to decorate spaces for my girls. It might be because I can use colours that I wouldn’t ordinarily use for myself, or perhaps it’s my love of things cartoonish and whimsical. When you move in with Mr. A-Framed-Hockey-Jersey-IS-Art, you give up a teensy bit of your decor freedom.
But, I also don’t want to make hefty investments in artwork that hangs on the girls’ walls. They’ve got a lot of time to develop their own tastes and already, Miss Lila has quite the opinion on what is and what isn’t “beautiful”. I can’t imagine spending $50 on a piece of art that she would later decry is “not purple enough” or is suddenly scary at bedtime (this child will use any excuse to prolong bedtime… seemingly harmless pictures included).
Easy Art Project #1:
This piece hangs on Lila’s wall, and has since she was a wee little newborn (who didn’t sleep in that room and much preferred the three inches next to my face).
The “print” is actually a piece of scrapbook paper. It was $.35 at the scrapbooking store, and with an inexpensive frame, it suddenly became adorable artwork! At many scrapbooking stores (and some larger craft stores have a decent paper selection), you can find great papers that look beautiful on the wall and are easily changed out as tastes change.
Easy Art Project #2
This is one of my favourite art projects in our house. This series of pictures hangs on Lucy’s bedroom wall.
Each print is an illustration from a copy of “Cinderella” that I purchased at the discarded book sale at the library. I took the book apart – I know, I know… it’s kind of a sin to take books apart, but this was worth it – and popped them into frames from a home decor store. The pictures I chose show Cinderella going to the ball, dancing, and then leaving sans glass slipper.
I love how they turned out. And all from a $1.00 book!
Easy Art Project #3 (with tutorial and grumpy toddler)
This project involves the the combination of children and paint. You don’t have to invite children to do this project (and if you want them to turn out a certain way, it’s probably best that you do this by yourself), but because this piece was going in Lila’s room, I let her try her hand at it.
And there’s something so charming about a piece that a kiddo has created. There’s a lot of pride in it!
You will need some brushes, a canvas (I chose 12×12 canvases, because I like the size, and because an 8 pack of them was on sale this week!) and some paints. We opted to use acrylic paints, because I wanted the colours to be vibrant.
*Cue the whirring of the Helicopter Mother… “Non-washable paint!?!?!? Whaaaaaat……????”*
I used my Cameo to cut out a vinyl silhouette of a ballerina, which was Lila’s picture of choice. Lucy was supposed to do a unicorn (her choice), but upon hearing that we would be painting over it, she had a full-blown conniption and then stomped away from our craft table.
Sigh. Two-year-olds just sometimes can’t see the vision. Why can’t you see the vision, Lucy?
We adhered the ballerina to the canvas and then got started.
Lucy decided to join us (“But no uni-cown, mommy!”) and the girls carefully painted their masterpieces.
I told Lila to paint over the ballerina, and she took that very seriously. I had to remind her than we would be peeling up the sticker and that her careful “ballerina-tracing” would be no longer. In the picture above, she’s painting windows for the ballerina. It took a while to convince her to paint the ENTIRE canvas.
Notice that Lucy is wearing a Hallowe’en shirt. This child does her own thing.
Lila diligently painted her canvas all by herself. She took great care to paint the edges.
When it came time to lift up the silhouette, Lila could not contain herself and reached over to “help”. Ahhhhhhh!!!! A little glob of “help” touched the ballerina and is now the “signature” of the piece. I quieted down the Controlling Mommy Monster that lives inside of me, and told her that it looked like a bow on the ballerina’s slipper.
And here it is, in its finished glory!
Lila is thrilled with her artwork. Again, I was just the prep and clean-up lady – I barely had a hand in the execution of this piece. It is now proudly displayed in Lila’s room and cost $2.00 in canvas and probably less than $1.00 in paint and supplies.
While not everyone has access to a Cameo cutter, this could be easily replicated with decals, stickers, or even paper cutouts that are tacked down with a light adhesive. The possiblities are endless!
These three art pieces are ones that I am happy to have on the girls’ walls. And if I need to switch things up, it’s quick and easy to create more artwork. I always keep my eyes open for books, calendars and scrapbooking papers with beautiful illustrations. They can be just as lovely as a print, but for a fraction of the cost!


13 comments
Dwell on Joy
I will have this on my mind as I think of what to hang in the boys rooms! I love the idea of framing scrapbook paper!!! Happy Weekend!!!
Tara @ Suburble
Scrapbook paper has come a LONG way, and there are some really great papers that have coordinating sets (which means you can create a “series” of pictures). Let me know if you give it a whirl! 🙂
Mel Lea-Wood
Sorry hit post before I finished, I really love the Cinderella idea that’s fantastic!
Tara @ Suburble
Thanks, Mel! I love the Cinderella pictures too – they’re probably my favourite art pieces of the three (and perhaps because they were a bit of a “find”, which always makes me love something that much more…)
Mel Lea-Wood
That’s a really fun idea for the little ones
amy of while wearing heels
What a lovely project and an even lovelier way to spend the afternoon.
Tara @ Suburble
I will tell Lila that you like her work! It was a nice way to spend the afternoon… though there were a few grumbles out of the gal wearing the “Boo!” shirt. You can’t force creativity… that’s for sure. 😉
Ali
That’s a great idea! I think I’ll try that this weekend with my girls. 🙂 If I do I will tag your blog as thanks for the idea 🙂
Tara @ Suburble
Ali – Please let me know if you do! I’d love to see how it turned out!
Jamie
Hello! I think this is an old post, but maybe you’ll still see this and respond! I would love to get more information about what material you used to make the cameo cutout? Does it have adhesive on it? Did the cameo make the entire cutout, you just lifted it from the sheet with no manual cutting? I’ve been comtemating getting a cameo for awhile and this project just might be what sets me over the edge. I’m looking into doing this for a big group of girls. About 50, ages 6-17 and I think it will be awesome! Just need details on that adhesive image! Thank you SO much!
Tara
Hi Jamie!
The Cameo did all of the cutting for me – I just “weeded” away the excess and used transfer paper to lift it. The vinyl I used is adhesive vinyl – it has a sticky back that held it to the canvas. You just have to be sure to press very firmly (or have the girls do this) on the edges to avoid paint bleeding underneath.
Let me know if you have any other questions, and I’ll do my best to help!